
Step by step: Windows Virtual Desktop and FSLogix
21 March 2019 the Windows Virtual Desktop preview went live. My colleague Jan Bakker and myself went straight to all available documentation, and build a test environment together. In this blogpost we will show you how to setup a Windows Virtual Desktop (WVD) environment, and what to watch out for. As a bonus we will also show how to install and configure FSLogix. This tutorial will be a step by step guide to setup a complete demo environment from scratch.
What is Windows Virtual Desktop?
Windows Virtual Desktop is a new service from Microsoft and enables you to deliver a virtual desktop from the Azure cloud. This could be a multi-user Windows 10 desktop, but also Windows 7 (with extended support) is possible. It also gives you the ability to install Office 365 ProPlus on the virtual desktops. Windows Virtual Desktop is a scalable service to deploy virtual machines, made possible by Azure resources, storage and advanced networking. The back-end like RDS brokers, gateways, web access, databases, and diagnostics are hosted and managed by Microsoft.
Table of Contents
- Requirements
- Create azure tenant & subscription
- Installing Active Directory Domain Services
- Installing Azure AD Connect
- Configuring Windows Virtual Desktop
- Connecting to Windows Virtual Desktop
- Optional: Virtual Desktop VM’s & FSLogix
- More info
1. Requirements
To use Windows Virtual Desktop there are some requirements:
-
Active Directory Domain Services
-
An Azure tenant
-
An Azure subscription with credits.
The virtual machines that are deployed have to be domain joined, or be hybrid domain joined. Azure AD join is not (yet?) possible. So Windows Virtual Desktop is depending on an Active Directory domain. The VM’s will be joined to this domain, and with the use of AD Connect, you can login with your own Azure AD credentials. There are 3 options for Active Directory Domain Services:
-
Install / Enable Azure Active Directory Domain Services in your Azure subscription
-
Install the Active Directory Domain Services role on a server in Azure
-
Connect your own on-premises network with Active Directory to your Azure tenant with a Site-2-Site VPN or ExpressRoute connection
In this blog we choose option 2: We install a Windows Server 2019 VM and install the ADDS role.
2. Create azure tenant & subscription
In this blog we start from scratch. We’ll show you how to deploy Windows Virtual desktop in a greenfield environment. So we start with requesting a 30-days Azure trial subscription. You can request your trial here: https://azure.microsoft.com/nl-nl/free/
Follow the steps to create the trial subscription. You’ll also need a creditcard. No worries, this is only for verification, no actual costs will be charched.
Because we will need an internet routable domainname, we will add this right away to our Azure AD tenant. This domainname we will also use for our Active Directory domainname. This isn’t necessary, but it will make sure we have an easier domainname for our Azure AD users.
We’lll use the domainname: resultaatgroep.eu
HINT: You can also use the standard extension: tenantname.onmicrosoft.com Your own domain is optional.
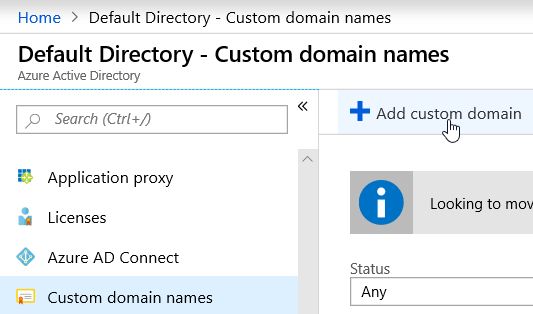
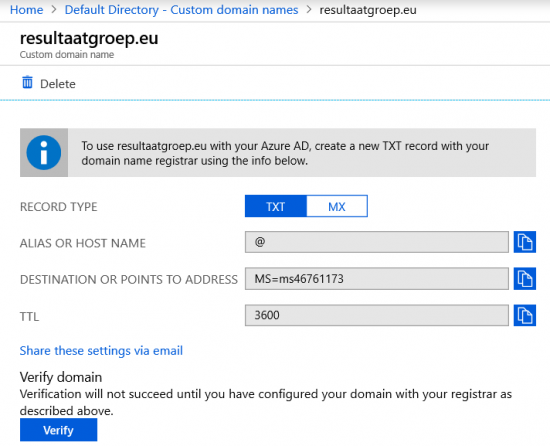
As soon as we added the custom domainname, we have to create a TXT record in the public DNS console to validate the domain, and after that we can start creating users with the suffix: @resultaatgroep.eu
3. Installing Active Directory Domain Services
To deploy Active Directory we first need a server in our subsciption. We’ll also need a network to which the server can connect to. However, we can create the network during the VM creation wizard.
To to: “Virtual Machines”, and click on “+ Add”
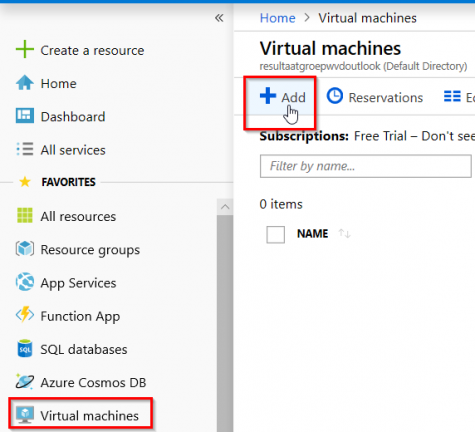
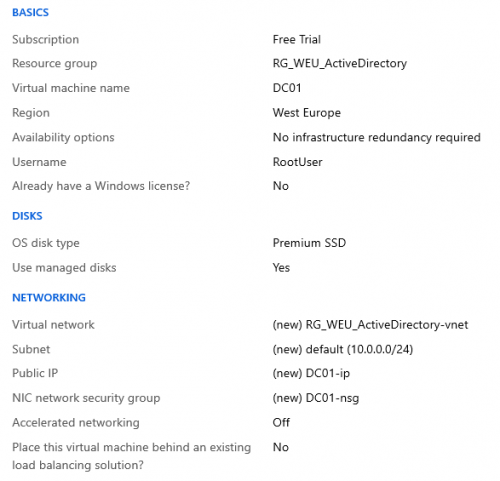
Then follow the steps to deploy a Windows Server 2019 Datacenter VM.
Create during the wizard also an extra datadisk. We’ll need the disk to create the Active Directory Domain Services database on.

NOTE: we give our VM a public IP adres, this is not recommended in a production environment.
If you do this, make sure you apply a Network Security Group that allows only RDP connections from your own WAN address. You could optionally also create a Point-2-Site VPN connection
For more information: https://docs.microsoft.com/en-us/azure/virtual-machines/windows/quick-create-portal
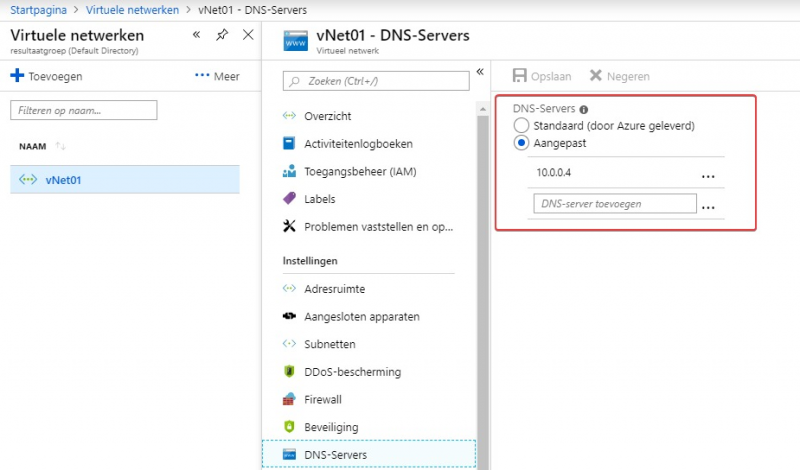
When your VM is done, go to “Virtual Machines” –> [VM naam] and note the private IP address. By default the vNet in Azure will give give the Azure DNS servers to servers. As we will install Active Directory Domain Services & DNS on our VM, we can change the DNS server of the vNet already to the IP address of our VM.
Go to Virtual Networks and click on your vNet. At the section DNS servers you can fill out your own DNS server, use the private IP address of your VM that will host the DNS server role.
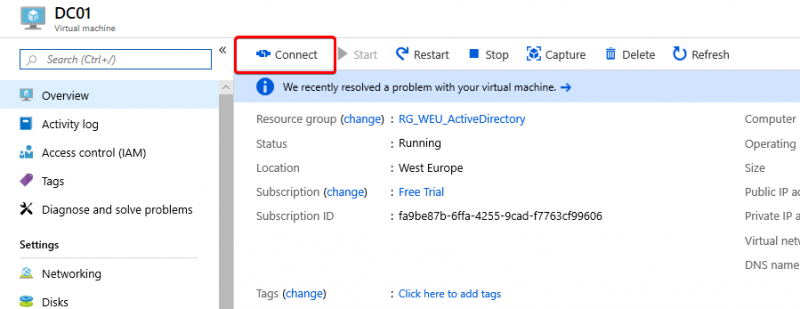
When this is done, go to your VM again and click on Connect to download the RDP file, and login to your VM
Next you can install Active Directory Domain Services. In our demo we’ll use PowerShell for this. As a best-practice, make sure all data is on a datadisk, and not on an OS disk. This also goes for the AD database, log directory and sysvol directory. Change the values to your own domain, and check if the datadisk (here with F:\) is visible
1
2
3
4
5
6
7
8
9
10
11
12
13
$securestring = ConvertTo-SecureString -AsPlainText -Force -String *********
Install-windowsfeature -name AD-Domain-Services -IncludeManagementTools

$parameterSplat = @{
    SysvolPath = "F:\\SYSVOL"
    LogPath = "F:\\NTDS"
    DatabasePath = "F:\\NTDS"
    DomainNetbiosName = "RESULTAATGROEP"
    DomainName = "resultaatgroep.eu"
    Force = $true
    SafeModeAdministratorPassword = $securestring
}
Install-ADDSForest @parameterSplat
Create OU for the Windows Virtual Desktop VM’s
Now Active Directory has been installed and ready for use we can create a couple of OU’s that will house our WVD servers, and our users. We will also do this with PowerShell, but you can also do this with the GUI.
1
2
3
4
5
New-ADOrganizationalUnit -Name ResultaatGroep -Path "DC=resultaatgroep,DC=eu"
New-ADOrganizationalUnit -Name Groups -Path "OU=ResultaatGroep,DC=resultaatgroep,DC=eu"
New-ADOrganizationalUnit -Name Users -Path "OU=ResultaatGroep,DC=resultaatgroep,DC=eu"
New-ADOrganizationalUnit -Name Servers -Path "OU=ResultaatGroep,DC=resultaatgroep,DC=eu"
New-ADOrganizationalUnit -Name "Windows Virtual Desktops" -Path "OU=Servers,OU=ResultaatGroep,DC=resultaatgroep,DC=eu"
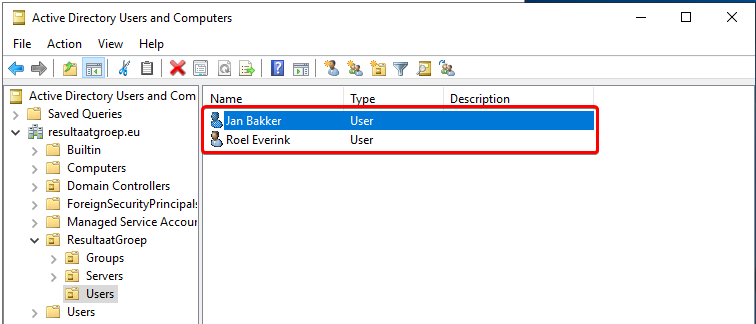
Creating testaccounts
To login at our Virtuele Desktops, we create a couple of testaccounts. You’ll need these before you create the WVD hostpool, as you need to supply users during the wizard.
1
2
3
4
5
6
7
8
9
10
11
12
13
14
15
16
17
18
19
20
21
22
23
24
25
26
27
$newADUserSplat = @{
    Path = "OU=Users,OU=ResultaatGroep,DC=resultaatgroep,DC=eu"
    ChangePasswordAtLogon = $false
    UserPrincipalName = "jan@resultaatgroep.eu"
    GivenName = "Jan"
    AccountPassword = (ConvertTo-SecureString -AsPlainText -Force -String "******")
    SamAccountName = "jan"
    DisplayName = "Jan Bakker"
    Name = "Jan Bakker"
    Enabled = $true
    Surname = "Bakker"
}
New-ADUser @newADUserSplat

$newADUserSplat2 = @{
    Path = "OU=Users,OU=ResultaatGroep,DC=resultaatgroep,DC=eu"
    ChangePasswordAtLogon = $false
    UserPrincipalName = "roel@resultaatgroep.eu"
    GivenName = "Roel"
    AccountPassword = (ConvertTo-SecureString -AsPlainText -Force -String "******")
    SamAccountName = "roel"
    DisplayName = "Roel Everink"
    Name = "Roel Everink"
    Enabled = $true
    Surname = "Everink"
}
New-ADUser @newADUserSplat2
4. Installing Azure AD Connect
Next we will install Azure AD Connect to synchronize our Active Directory with Azure Active Directory.
You can download the install file here: https://www.microsoft.com/en-us/download/details.aspx?id=47594
To save cost, we will install this on our Domain Controller.
Download the installfile and execute it, wait till the wizard starts.
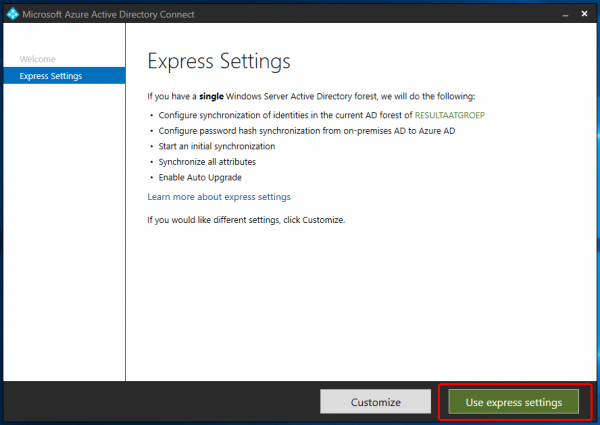
We choose for “Use express settings”. You can pick Customize if needed for OU filtering or other settings. For our demo this isn’t important.
During the install you will be asked for Azure AD credentials and ADDS credentials
For Azure AD you’ll need Global Admin rights, and for ADDS you’ll need an Enterprise Administrator.
After the install the synchronize will start automatically. You can check in your Azure AD tenant if the sync was succesfull.

5. Configure Windows Virtual Desktop
To use Windows Virtual Desktop (WVD) there are a few steps to be taken to give the back-end service and web client rights to your Azure AD tenant.
The WVD back-end and client app are multi-tenant enviroments which are managed by Microsoft. That means that, by default, the WVD environment has no rights to our Azure tenant. There is also no WVD tenant for us yet.
So first we have to create the WVD tenant, and give rights to our Azure tenant.
Assigning rights to the WVD back-end & client app
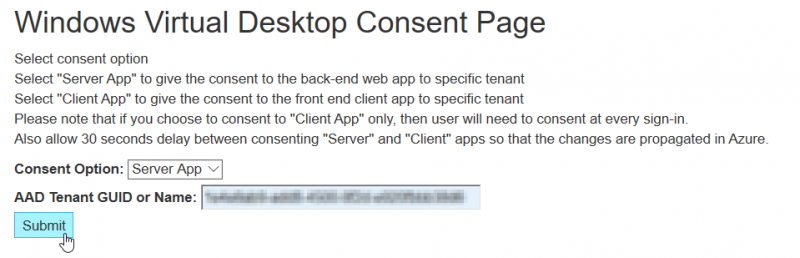
to go the site: https://rdweb.wvd.microsoft.com/
first, select here “Server App” and fill in your Tenant ID.
Then wait about 30 seconds, and select: “Client App” with the same Tenant ID.
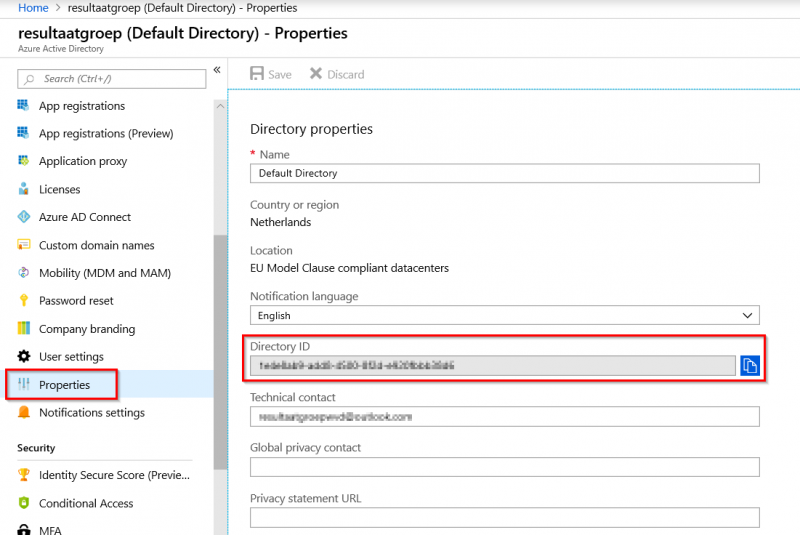
You can find your Tenant ID at the following location:
“Azure Active Directory” –> “Properties” –> “Directory ID”
Creating the WVD tenant
Creating the tenant is done on the server back-end, which we just gave rights to our Azure tenant.
We just have to give a user (or service principal) rights to create the actual WVD tenant. Go in the Azure portal to: “Azure Active Directory” –> “Enterprise Application”
In the list are 2 applications: “Windows Virtual Desktop” & “Windows Virtual Desktop Client”
These have been created because we gave them access to our Azure tenant in the previous step.
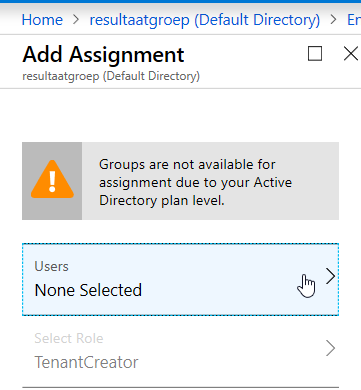
Click on:“Windows Virtual Desktop” –> “Users and groups” and click on: “Add user”
At role there is only one option and its preselected: TenantCreator. Select one or multiple users who can create a tenant. And click on “Assign”
Create the tenant with the following commands: The AadTenantId we already have from the previous steps
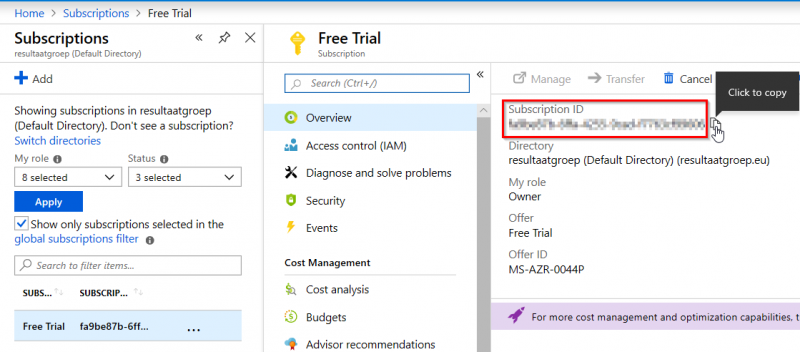
You can find the subscriptionId in the portal: “All Services” –> “Subscriptions” –> “Subscription ID”
Because we will login at the back-end, we can also create a service principal which has rights to create host pools in WVD, and to add servers to the hostpools
You can use the service principal because later during the WVD wizard you’ll use an account to create the host pools. And MFA enabled accounts aren’t supported. If you use a regular user account that isn’t MFA enabled you can skip creating the service principal.
Start PowerShell as administrator (to install modules) and execute the following commands (substitute variables for your environment):
1
2
3
4
5
6
7
8
9
10
11
12
13
14
15
16
17
18
19
20
21
22
23
24
25
26
27
Install-Module -Name Microsoft.RDInfra.RDPowerShell, AzureAD
Import-Module -Name Microsoft.RDInfra.RDPowerShell, AzureAD

#Setup variables, tenantName will be the name of our WVD tenant
$tenantName = "ResultaatGroep-WVD"
$AadTenantId = "11111111-2222-3333-4444-555555555555"
$subscriptionId = "11111111-2222-3333-4444-555555555555"

#Login at the WVD back-end (with the account that has TenantCreator rights)
Add-RdsAccount -DeploymentUrl "https://rdbroker.wvd.microsoft.com"

#Creating the RDS tenant
New-RdsTenant -Name $tenantName -AadTenantId $AadTenantId -AzureSubscriptionId $subscriptionId

#Login to Azure AD with a global admin account to create a service principal
$aadContext = Connect-AzureAD

#Creating theservice principal with credentials
$svcPrincipal = New-AzureADApplication -AvailableToOtherTenants $true -DisplayName "Windows Virtual Desktop Svc Principal"
$svcPrincipalCreds = New-AzureADApplicationPasswordCredential -ObjectId $svcPrincipal.ObjectId

#Assign rights to the service principal
New-RdsRoleAssignment -RoleDefinitionName "RDS Owner" -ApplicationId $svcPrincipal.AppId -TenantGroupName "Default Tenant Group" -TenantName $tenantName

#Make sure the credentials of the sevice principal are saved, you can see these with:
$svcPrincipal.AppId
$svcPrincipalCreds.Value
You’ll need the password and AppId in the next step.
Note: The next step is creating the hostpool, if you want to test FSLogix and Office 365 on your VM’s right away, then take the nessicary steps from chapter 7 first. There we will create install scripts for Office and the FSLogix agent, and we’ll configure it with Azure Blob storage. Offcourse, these steps can also be done afterwards.
Creating the hostpool
And now the creation of the Windows Virtual Desktop Hostpool. This is done from the Azure portal.
Choose: + Create a resource and search for Windows Virtual Desktop. Choose for: Windows Virtual Desktop – Provision a host pool
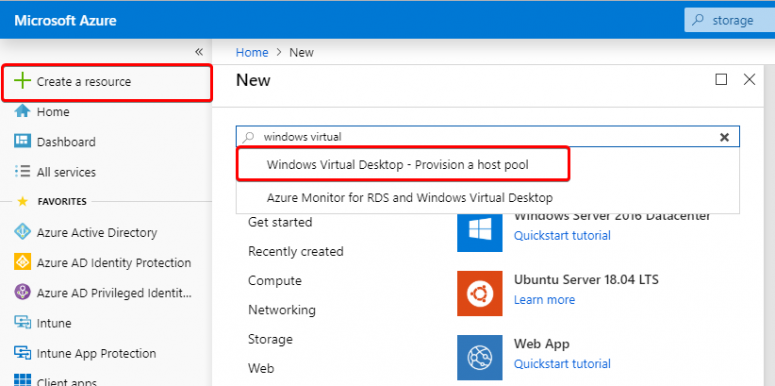
Then choose for Create

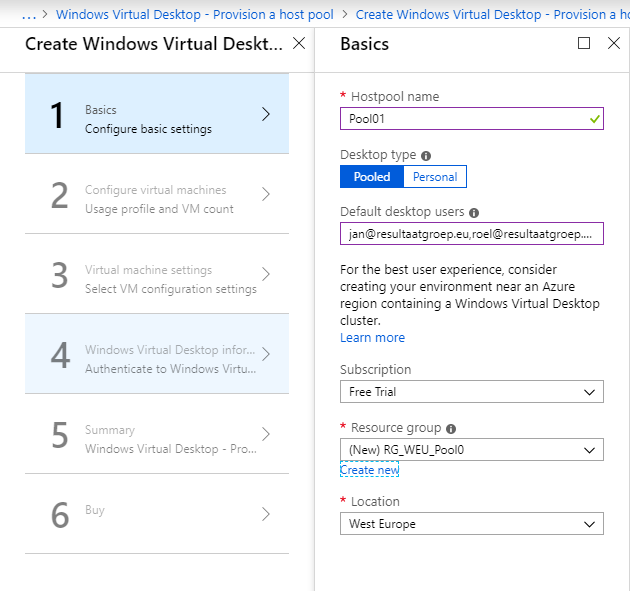
Choose a Poolname, and pick your type. We go for Pooled, but you can also create peronal VM’s
Then fill in your testusers that you made earlier. These users will be linked to this pool and can use its resources.
Fill in the Resource Group op. It has to be empty.
Then you assign the location.
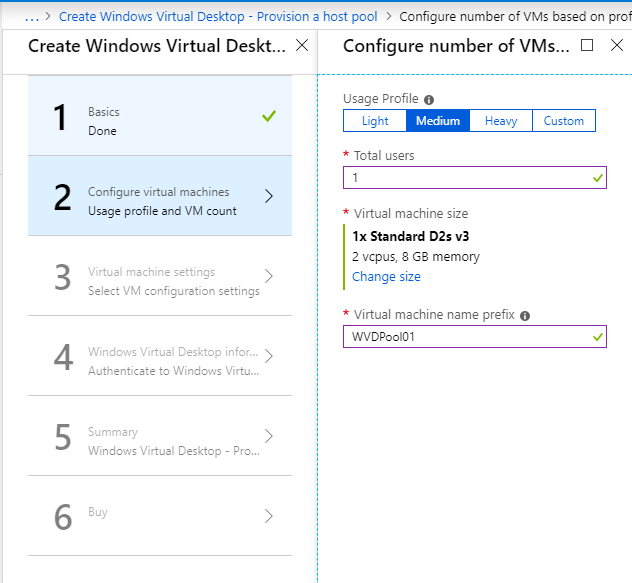
In this windows we will determine the amount and type of VM. You can choose at will, for our test 1 VM of type D2s_v3 will suffice.
Also fill in the prefix for your VM’s.
More information about scaling and pricing can be found here.

Here we will determine the OS verion, domain and the vNet
We choose for the standard Gallery sourceWindows 10 Enterprise multi-session.
We also fill in the info to join our VM to the domain: resultaatgroep.eu.
Note: the vNet you select here has to be able to reach your domain controller
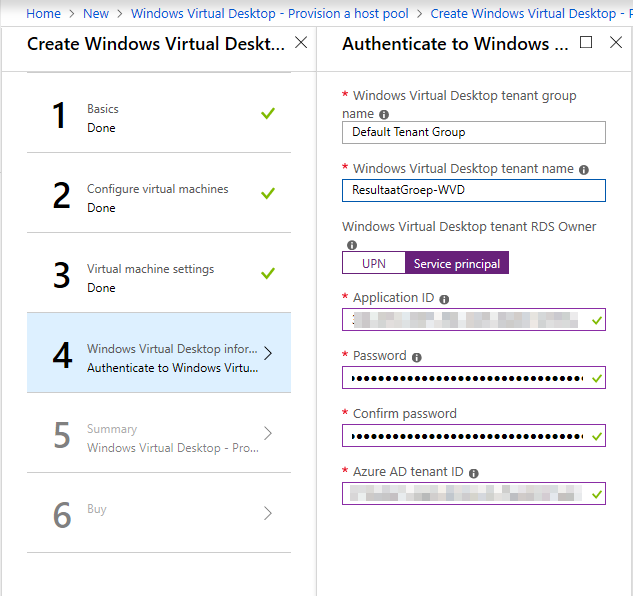
In this step you fill out your tenant group name and tenant name. You created this earlier and has to match.
Also fill out your RDS Owner, this could be a (non MFA enabled) users, but in our case we use the Service Principal that we created earlier.
We also fill out our Azure AD tenant ID.
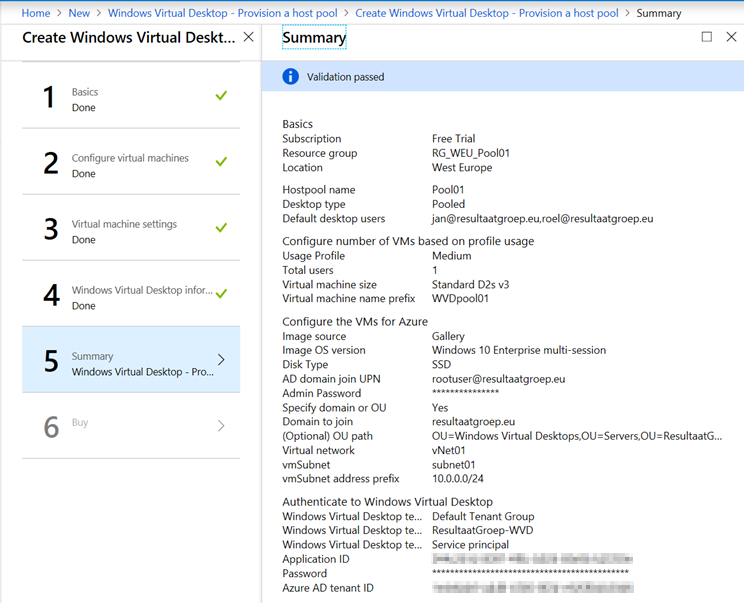
In step 5 there’s a validation and summary of our steps, check this one final time and choose Next to finish the wizard
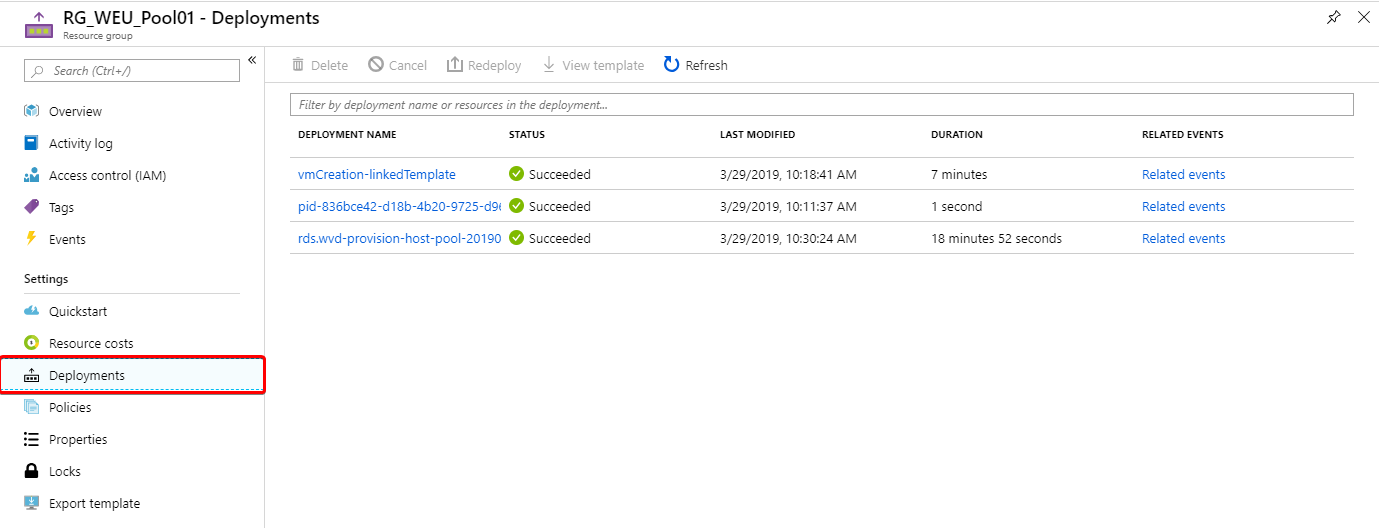
You can follow the status of your deployment under Deployments while inside your Resource Group.
At the moment of writing this, it is not yet possible to give a group rights to a hostpool, only users can be granted rights to a hostpool
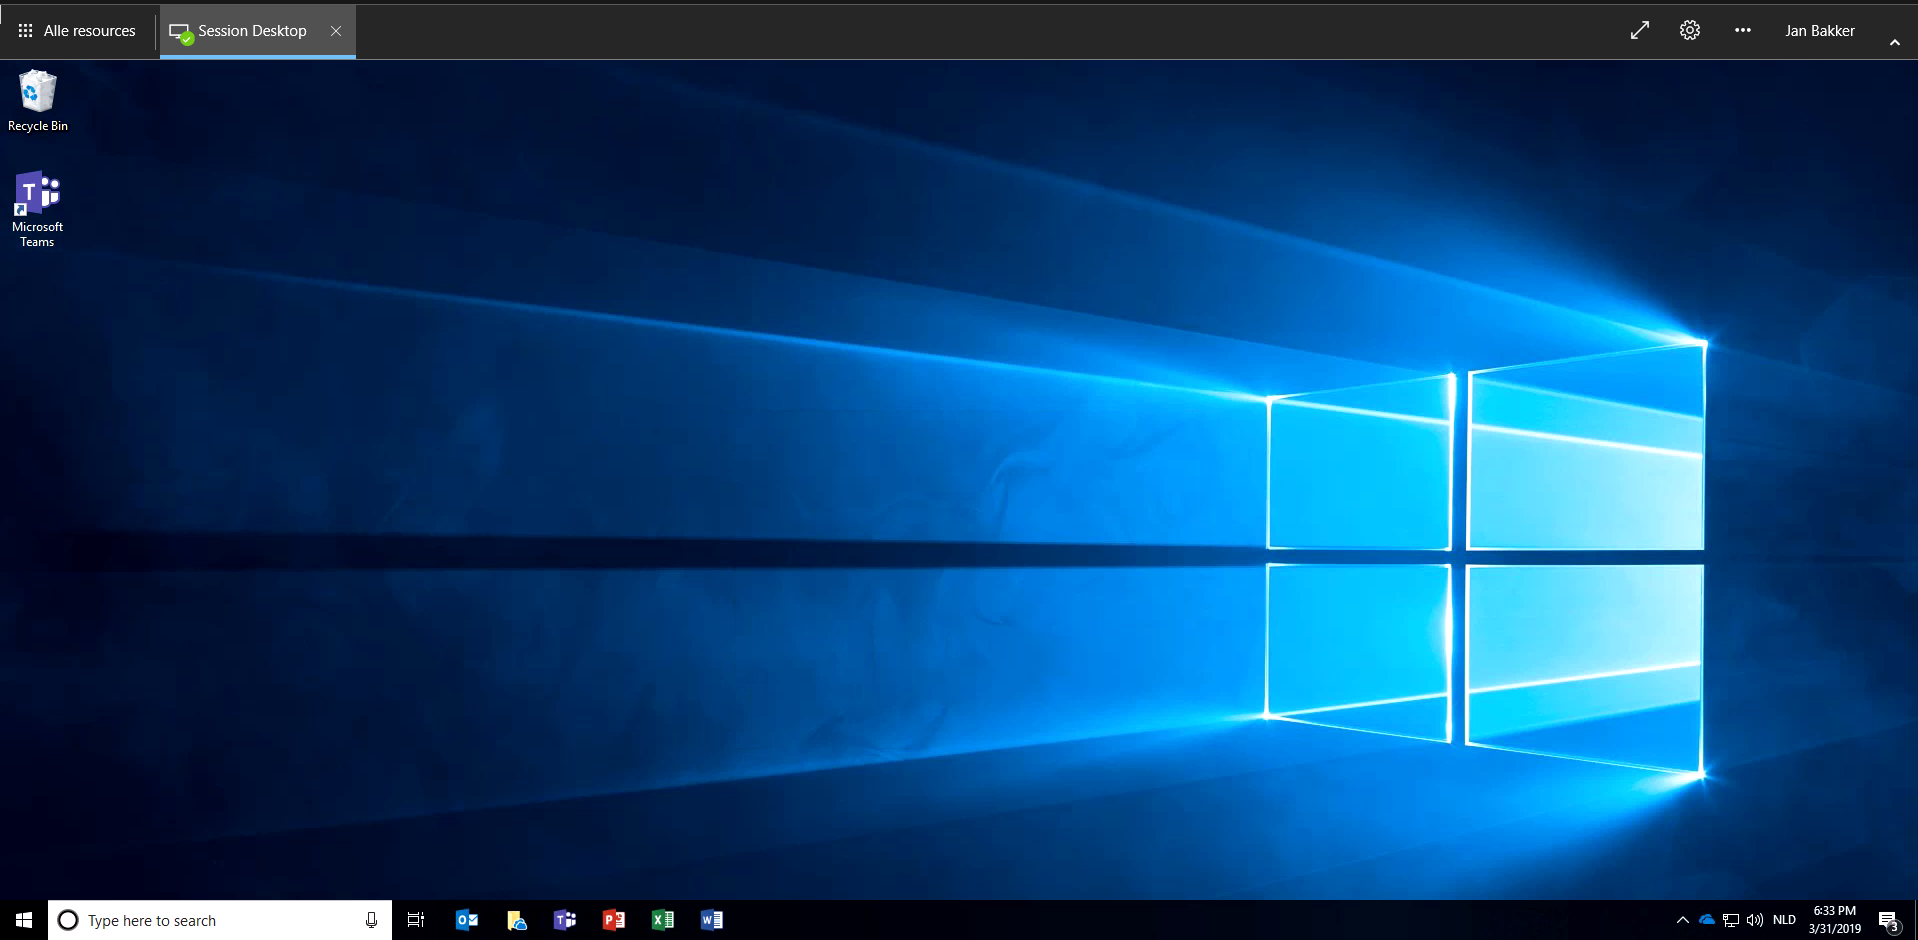
6. Connecting to Windows Virtual Desktop
You can connecto to Windows Virtual Desktop in 2 ways, will we show both.
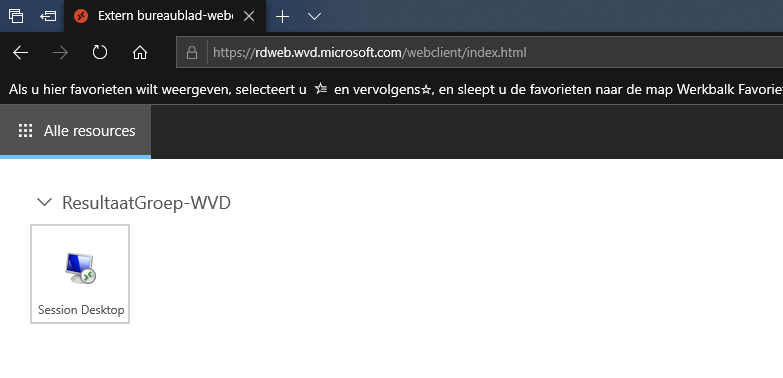
HTML 5 browser
The easiest method is the browser. Go to https://rdweb.wvd.microsoft.com/webclient and login with your testuser.
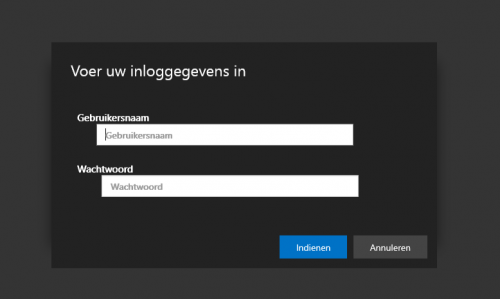
Unfortunatly SSO doesn’t work yet, that means that you have to login to Azure AD first, and after selecting your desktop or application, you have to login to the server.
With ADFS it is possible to create an SSO experience.
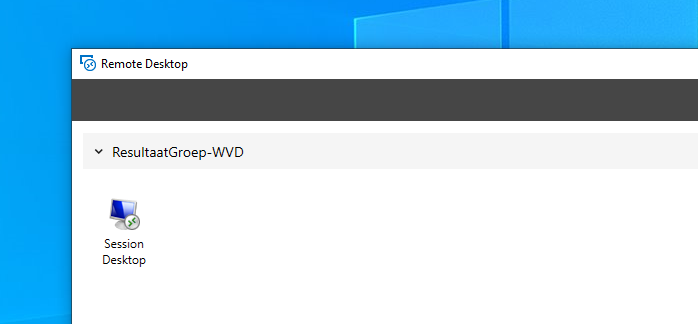
Windows client – Remote Desktop
You can also download the Windows client. The benefit is that it performs a bit better, and you get start menu integration.
You can download the client here
After the install you can choose Subscribe. then login with the testuser. testgebruiker.
6. Optional: Virtual Desktop VM’s & FSLogix
We also want to show you how to install and configure FSLogix. This step is optional, but certainly a good thing to do. With FSLogix you can store the profile, and with it, the Outlook/OneDrive cache and the searchindex in a separate VHDX that will connect to your session at logon time.
The VHDX is normally on an SMB fileshare on a server, but FSLogix also supports Azure page block storage! As we dont need a fileserver for the Azure storage that we’ll have to maintain and will incur compute cost, this is the best option for us! We recommend to first read the FSLogix documentation if you’re not yet familiar with it.
For all next steps goes: these are for our demo environment, some of these are not recommended for a production environment.
Storage account for the Profile Containers
We start with creating the Azure Storage Account. This will house the FSLogix VHDX files. If you prefer an SMB share that is also possible, then create a fileshare with these instructions: https://docs.fslogix.com/display/20170529/Requirements+-+Profile+Containers
Go to the Azure portal to create the storage account. Click on “Create a resource” Search for: “Storage account” and click on: “Create”
Follow the wizard to fill out all fields. We chose for premium storage, so the user experience is as fast as possible
We also only allow access from the subnet in which our Virtual Desktops will reside. This will also mage sure that a Storage Endpoint will be added to this subnet, so the latency to the storage will be as low as possible. The full settings are in the screenshot below.

GPO – Install FSLogix Agent
To install the FSLogix agent we use a group policy. You can download the software from https://go.microsoft.com/fwlink/?linkid=2084562
From the ZIP file you’ll need the FSLogixAppsSetup.exe and the TXT file with the licence. We also need the ADMX and ADML files to create the GPO for the agent settings.
Update: You don’t need a license anymore to install FSLogix, so that part is obsolete.
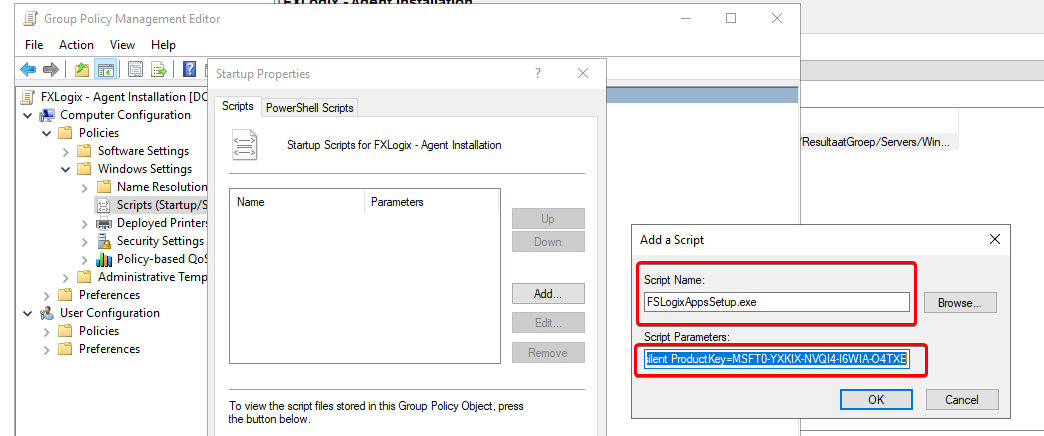
Make a new GPO under the OU that we created earlier. Go to Computer Configuration -> Windows Settings -> Scripts -> Startup. Click on Show Files and place the .EXE in the folder.
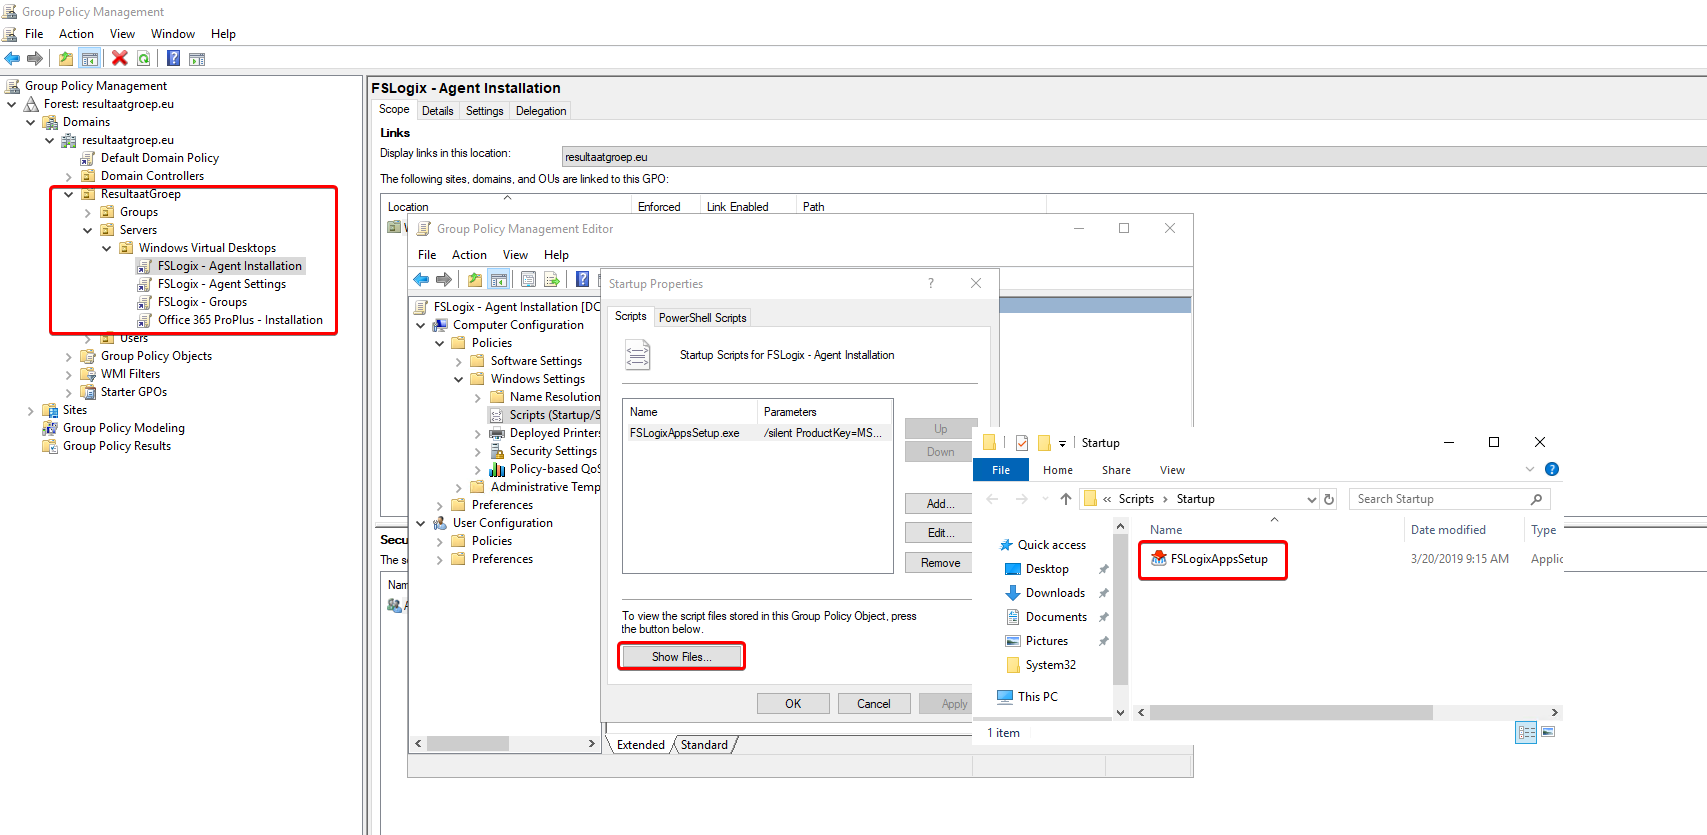
Next click on Add and add the .EXE. In the parameter field fill in: /silent ProductKey=MSFT0-YXKIX-NVQI4-I6WIA-O4TXE
Import ADMX files
Copy the file “fslogix.admx” (from theZIP file) to C:\Windows\PolicyDefinitions on your domaincontroller. Copy the file “fslogix.adml” to the C:\Windows\PolicyDefinitions\en-us\ folder.
GPO – Configure FSLogix Agent
To configure FSLogix we also make a group policy. Under Computer Configuration -> Policies -> Adminstrative Templates you can find the FSLogix settings.
Configure at least the following:
Computer Configuration -> Policies -> Administrative Templates -> FSLogix/Profile Containers
| Setting | Value |
|---|---|
| Enabled | Enabled |
| Size in MB’s | 25600 |
| Delete local profile when FSLogix Profile should apply | Enabled (be carefull with this setting in production environments) |
Computer Configuration -> Policies -> Administrative Templates -> FSLogix/Profile Containers/Advanced
| Setting | Value |
|---|---|
| Locked VHD retry count | 1 |
| Locked VHD retry interval | 0 |
Computer Configuration -> Policies -> Administrative Templates -> FSLogix/Profile Containers/Cloud Cache
| Setting | Value |
|---|---|
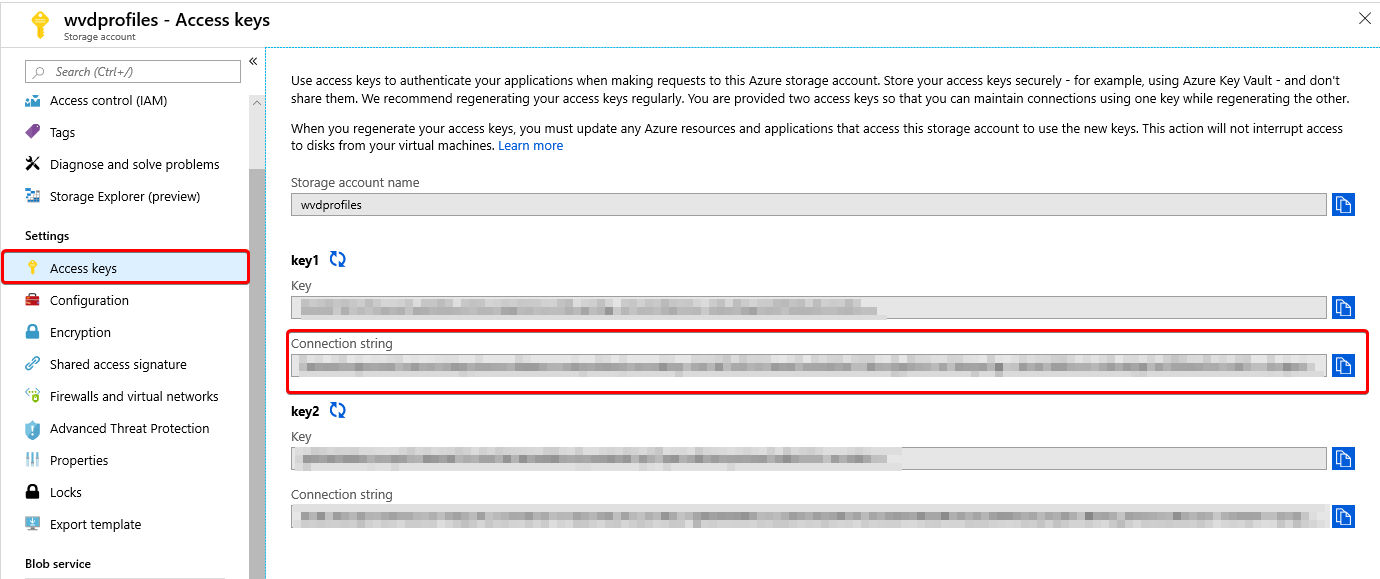
| Cloud Cache Locations * | type=azure,connectionString=”XXXXXXX” |
Computer Configuration -> Policies -> Administrative Templates -> FSLogix/Profile Containers/Container and Directory Naming
| Setting | Value |
|---|---|
| SID directory name matching string | %userdomain%-%username% |
| SID directory name pattern string | %userdomain%-%username% |
| Virtual disk type | VHDX |
* Replace the value XXXXXX for your own personal connection string of the storage account that you created earlier
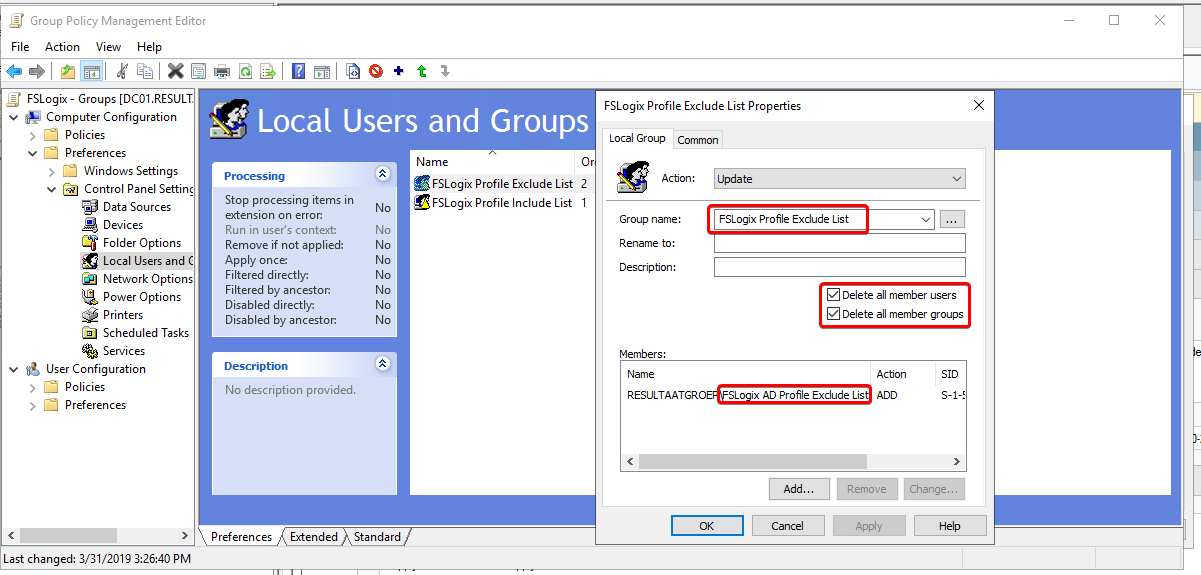
Creating Include and Exclude Groups (Optional)
By default there are 4 local groups so FSLogix is enabled for everyone. To determine who will be enabled for FSLogix Profile Containers and who will be disabled you can create 2 AD groups. We will add these to the groups which FSLogix made locally on the server(s). That way we can disable FSLogix for our domain admins or specific users.
Make 2 groups in AD: FSLogix AD Profile Exclude List & FSLogix AD Profile Include List. Make the AD group “Domain Admins” member of the exclude group, and add your testusers to the include group.
Then make a new GPO and add the AD groups to the local groups. The names of the local groups are: FSLogix Profile Include List & FSLogix Profile Exclude List. Enable the option to delete all members of the group
Office Deployment Tool
If you have a valid Office 365 license, you can also test with Office 365 ProPlus. For this we create a GPO that will install this during boot. We used the website https://config.office.com/ to create an XML for our install. Make sure you enable “Shared Computer Activation”, else the software doesn’t work properly on a multi-user environment. In our config we made a selection of a couple of products. The other applications will not be installed.
1
2
3
4
5
6
7
8
9
10
11
12
13
14
15
16
17
18
19
20
21
<Configuration ID="a02f45f4-6a0e-4215-85af-e2458dabbcf4" DeploymentConfigurationID="00000000-0000-0000-0000-000000000000">
    <Add OfficeClientEdition="64" Channel="Insiders" ForceUpgrade="TRUE">
    <Product ID="O365ProPlusRetail">
        <Language ID="MatchOS" />
        <ExcludeApp ID="Access" />
        <ExcludeApp ID="Groove" />
        <ExcludeApp ID="Lync" />
        <ExcludeApp ID="OneNote" />
        <ExcludeApp ID="Publisher" />
    </Product>
    </Add>
    <Property Name="SharedComputerLicensing" Value="1" />
    <Property Name="PinIconsToTaskbar" Value="TRUE" />
    <Property Name="SCLCacheOverride" Value="0" />
    <Updates Enabled="TRUE" />
    <RemoveMSI />
    <AppSettings>
        <Setup Name="Company" Value="ResultaatGroep" />
    </AppSettings>
    <Display Level="Full" AcceptEULA="TRUE" />
</Configuration>
To install Office you need the Office Deployment Tool. You can download it from here: https://www.microsoft.com/en-us/download/details.aspx?id=49117
Extract the files, you will need the “setup.exe” and the earlier made “Configuration.xml” in the next step.
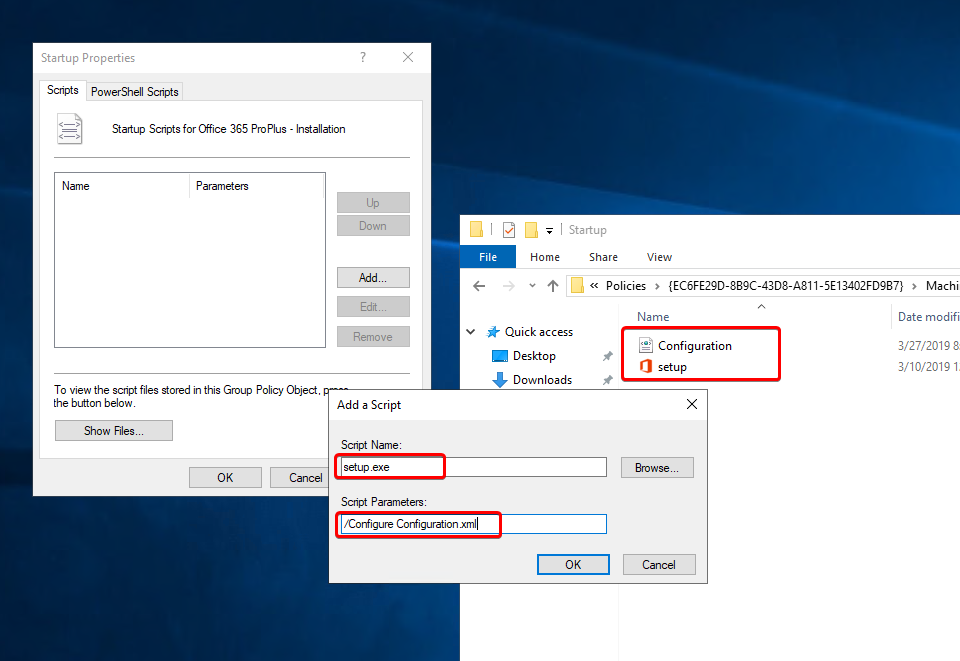
GPO – Install Office 365 ProPlus
Make a new GPO. Go to Computer Configuration -> Windows Settings -> Scripts -> Startup and place, like before with the FSLogix agent, now the setup.exe and the configuration.xml in the folder.
Then click on Add and choose the setup.exe file. And the script parameter field you enter: /Configure Configuration.xml
Now link the GPO to the OU that you made before for your Windows Virtual Deskop VM’s.
Office 365 ProPlus settings for Outlook (Optional)
This step is optional. You can also configure the cache manually on the clients
To configure the cache we create a GPO based on the Office 365 ProPlus ADMX files. You can download the files from the following link: https://www.microsoft.com/en-us/download/details.aspx?id=49030
Copy at least the ADMX and ADML of Outlook to C:\Windows\PolicyDefinitions on your domain controller.
Note, this time we use the User Configuration section to force the cache settings
Make a new GPO and configure as following:
User Configuration -> Policies -> Administrative Templates -> Microsoft Outlook 2016/Account Settings/Exchange/Cached Exchange Mode
| Setting | Value |
|---|---|
| Cached Exchange Mode Sync Settings | Enabled |
| Select Cached Exchange Mode sync settings for profiles | determine yourself |
| Use Cached Exchange Mode for new and existing Outlook profiles | Enabled |
Rebooting Server(s)
When all GPO’s have been made, you’ll have to reboot your servers. During booting the FSLogix agent and Office 365 will be installed. This will take a couple minutes ofcourse, but nothing too long, as your VM’s are connected to the Microsoft backbone.
After this you can login and configure Outlook and OneDrive for use. Offcourse your account needs a valid license for this.
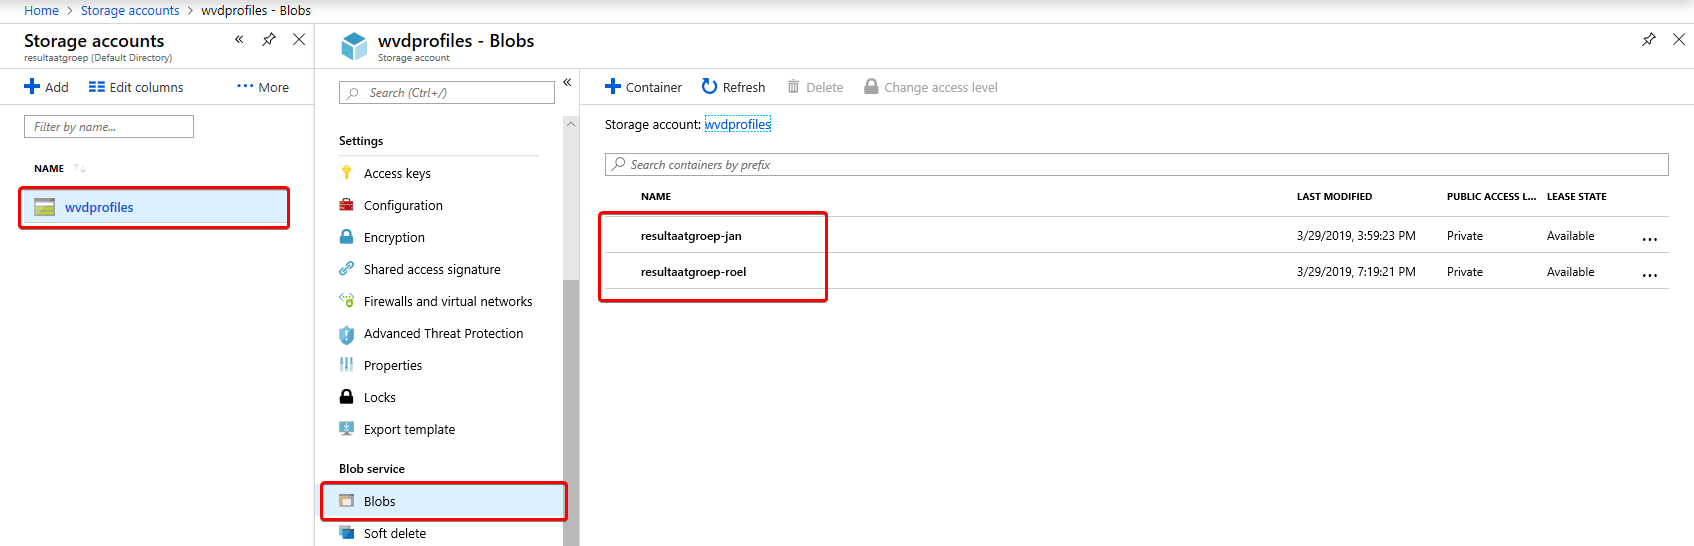
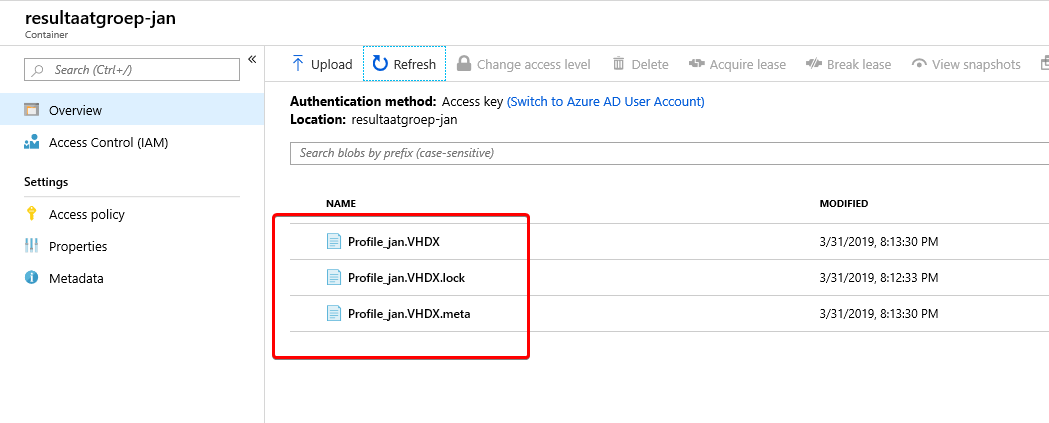
VHDX location
Now check the Azure portal if you can see the VHDX. If you did everything correct it will look like this:
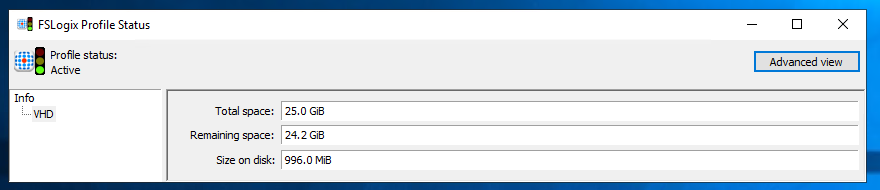
Troubleshoot Profile containers
With the FSLogix software a tool will be installed to easily read the FSLogix logging. It’s located on the following location: “C:\Program Files\FSLogix\Apps\frxtray.exe”
TIP: Copy this tool to C:\ProgramData\Microsoft\Windows\Start Menu\Programs\StartUp. This will make it start for all users
7. More info
We used the below sources for making this blog.
Windows Virtual Desktop Documentation
For questions or remarks you can reach us through LinkedIn.
| Roel Everink | Jan Bakker |
|---|---|
 |
 |