
Building a WVD image the right way
Over the past few months I’ve seen multiple articles about how to create a Windows Virtual Desktop (WVD) image. They usually login to the VM themselves, install some apps and do some modifications, and sysprep the VM. After that you can optionally make a snapshot of your VM, and then convert it to a managed image which you can use for a WVD deployment.
Now, this is all good for a POC, demo or small production environment. But when things start to scale out, it just doesn’t cut it anymore. When building any type of image, you’d want the following things taken care off.
- Consistent
- Automated
- Rollback procedure
You’d want consistency so you don’t accidental forget something in your golden image
Preferably you’d have something automate your creation of your image. Installing multiple pieces of software can be a tedious task, that time can be better spend doing something else. It also reduces the change of human error.
When you make a change to your golden image that breaks it, you’d better remember what you changed, and how to rollback to the previous state.
All those things can be solved by a single Azure service:
Azure Image Builder
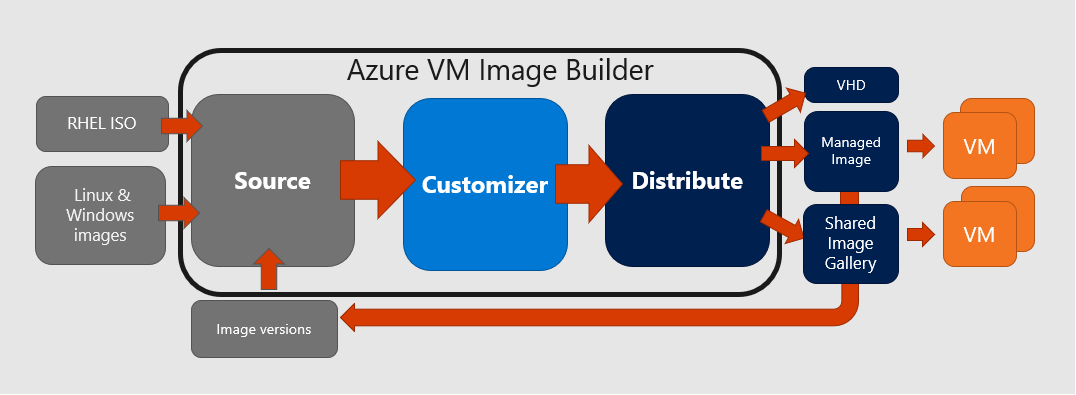
Azure Image Builder (AIB) allows you to take a source image, which can be any of the following:
- RHEL ISO
- Marketplace image
- Managed image
- Shared Image Gallery image version
It then can customize that specific image to your needs in an automated way.
And as a final step AIB can distribute your image to any or multiple of the following:
- Managed image
- Shared Image Gallery
- VHD in a storage account
You can see the overview in the following picture
Now, AIB is still in preview, so there are a few limitations to the service. It is limited to the following locations, but can still distribute outside of these locations.
- East US
- East US 2
- West Central US
- West US
- West US 2
There is also no GUI (yet?) for Azure Image Builder
When building the image there is no way to check the progress, other then checking the logs manually, or checking if your image is already present at your distribution location.
With that bit of background info, lets start creating our own image with AIB!
Register the feature
To use Azure Image Builder during the preview, we have to first enable the service. We do that by registering the feature. This can be done with PowerShell, so we need to install the Az module within a privileged PowerShell windows, and after that we can login to our subscription
1
2
Install-Module Az -Force
Connect-AzAccount
When that is done, we can register the AIB feature with the following PowerShell command:
1
Register-AzProviderFeature -ProviderNamespace Microsoft.VirtualMachineImages -FeatureName VirtualMachineTemplatePreview
To check the status of the feature, run the following command
1
Get-AzProviderFeature -ProviderNamespace Microsoft.VirtualMachineImages -FeatureName VirtualMachineTemplatePreview
Note: It can take a while before the registrationstate will change to: Registered
After that make sure the following 2 commands also show Registred.
1
2
Get-AzResourceProvider -ProviderNamespace Microsoft.VirtualMachineImages | Select-Object RegistrationState
Get-AzResourceProvider -ProviderNamespace Microsoft.Storage | Select-Object RegistrationState
If there’s something showing NotRegistered run the following commands
1
2
Register-AzResourceProvider -ProviderNamespace Microsoft.VirtualMachineImages
Register-AzResourceProvider -ProviderNamespace Microsoft.Storage
When everything is done, you are ready for the next step!
Assign rights to AzureImageBuilder
During the previous step we enabled the feature, one of the things that happend, was that a service principal has been made in our Azure AD.
This service principal (SP) is used to give AIB rights on certian resource (groups). The Application ID of the service principal is always the same:
cf32a0cc-373c-47c9-9156-0db11f6a6dfc
This SP needs rights on a resourcegroup that will be used for AIB. We first make this resourcegroup with the command:
1
New-AzResourceGroup -Name "RG_EUS_AzureImageBuilder" -Location 'East US'
The location needs to be in one of the supported AIB regions. Here I choose East US. Then we have to assign the contributor right to our SP for this resource group. You can do this with the portal, or also with the commandline.
1
New-AzRoleAssignment -RoleDefinitionName "Contributor" -ApplicationId "cf32a0cc-373c-47c9-9156-0db11f6a6dfc" -ResourceGroupName "RG_EUS_AzureImageBuilder"

Deploying AzureImageBuilder ARM template
When all permissions are in place it’s time to start with the deployment.
This is done with an ARM template.
There is currently no portal experience for AIB.
The demo ARM template from Microsoft can be found on GitHub
If you look at the template you can see that on the properties part there are 3 sections
- Source
- Customize
- Distribute
For source the best way to go in my opinion is to pick a marketplace image. These are tested by Microsoft, and are regularly updated to a new version. Of course you have to choose a new version every month or so.
In the Customize section you can customize your VM with a PowerShell script. This can be an external (publicly available) script, in a storage account or on GitHub. Or it can be an inline script if it’s only a few lines.
In the Distribute section you can define how and where to distribute your images. The most easy is to just deploy a managed image in the same resourcegroup as your AIB service.
If you want to use the Microsoft quickstart template, you can download it and edit the following parts:
- Replace <subscriptionID> for your subscriptionID
- Replace <rgName> for your AIB resourcegroupname
- Replace <region> for a region OR replace it with a function that used the ResourceGroupFunction. That means replacing it for: [resourceGroup().location], including the square brackets
- Replace <imageName> for a custom managed image name
- Replace <runOutputName> for aibWindows (or something else you make up)
If however, you want to make use of another ARM template, I have one in my GitHub account as well, that uses parameters with some default values setup.
It will use the customize script that’s also in my GitHub account. It will install Visual Studio Code, Teams, Notepad++ and FSLogix.
To deploy this template use the following PowerShell commands
1
2
$TemplateUri = "https://raw.githubusercontent.com/Everink/AzureImageBuilder/master/Templates/AzureImageBuilder-ManagedImage.json"
New-AzResourceGroupDeployment -ResourceGroupName RG_EUS_AzureImageBuilder -TemplateUri $TemplateUri -OutVariable Output -Verbose
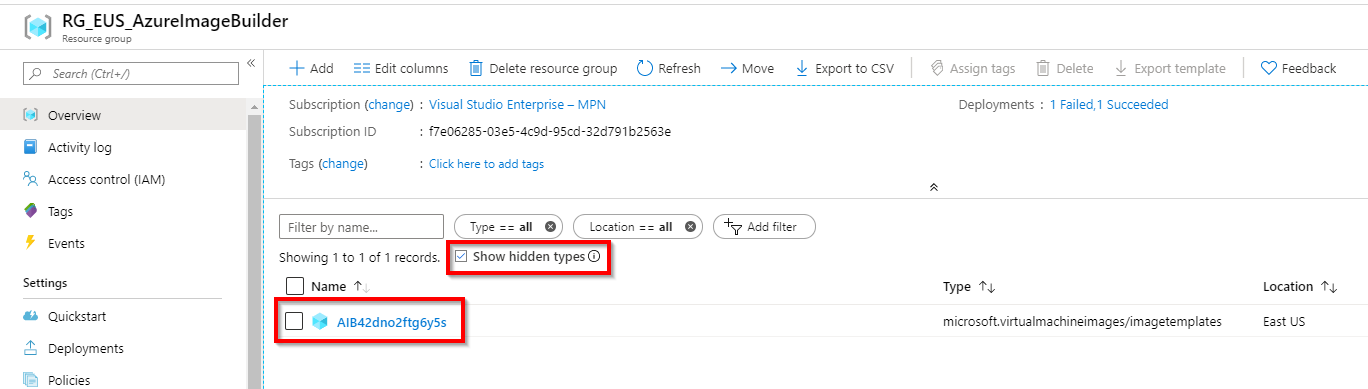
This will create an ImageTemplate package, which is linked to a new ResourceGroup IT_<AIB-resourcegroupname>_<AIB-imagetemplatename><random GUID>. In that resourcegroup it will setup all prerequisites, like downloading powershell scripts or files, and checking if AIB has all necessary rights on other resources (like Shared Image Gallery if you want to distribute to that)
It does not yet start building our image. It can be seen in the portal by selecting Show hidden items
In our previous PowerShell commandlet we used the output variable “Output”, to capture the name of our AIB imagetemplate. We can see it with
1
$Output.Outputs["imageTemplateName"].Value
We will use the imagetemplate name to start building our golden image. This can be done by invoking or executing the resource.
1
2
$ImageTemplateName = $Output.Outputs["imageTemplateName"].Value
Invoke-AzResourceAction -ResourceGroupName RG_EUS_AzureImageBuilder -ResourceType Microsoft.VirtualMachineImages/imageTemplates -ResourceName $ImageTemplateName -Action Run
This will start building the image.
To check the build status run the following command
1
(Get-AzResource -ResourceGroupName RG_EUS_AzureImageBuilder -ResourceType Microsoft.VirtualMachineImages/imageTemplates -Name $ImageTemplateName).Properties.lastRunStatus
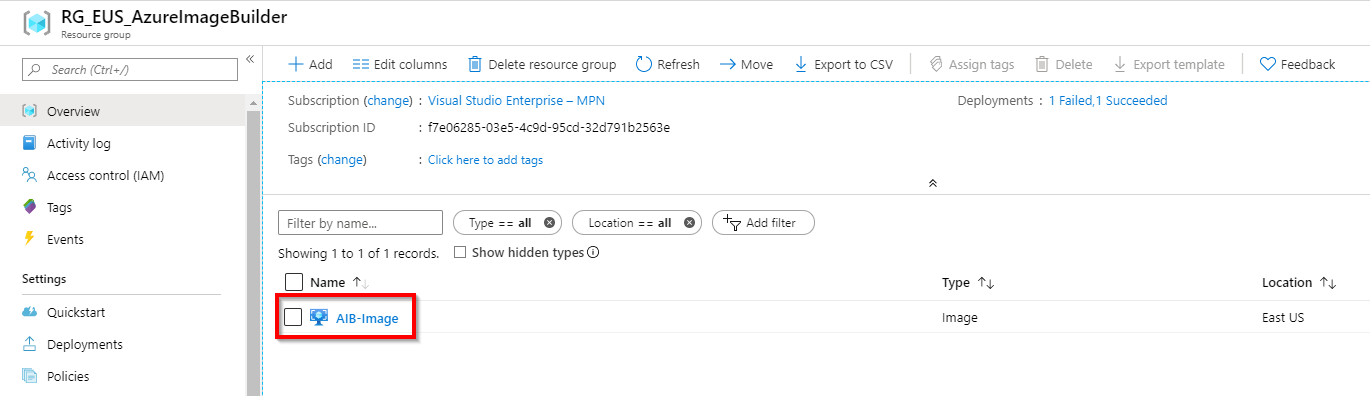
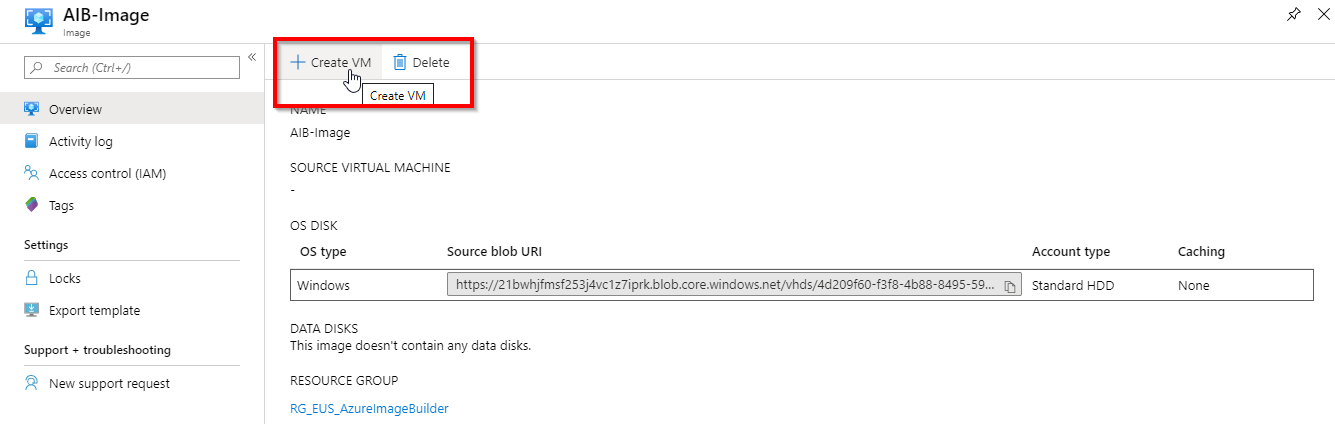
When the build is complete there will be a managed image in our resource group, and we can start deploying VM’s from it!
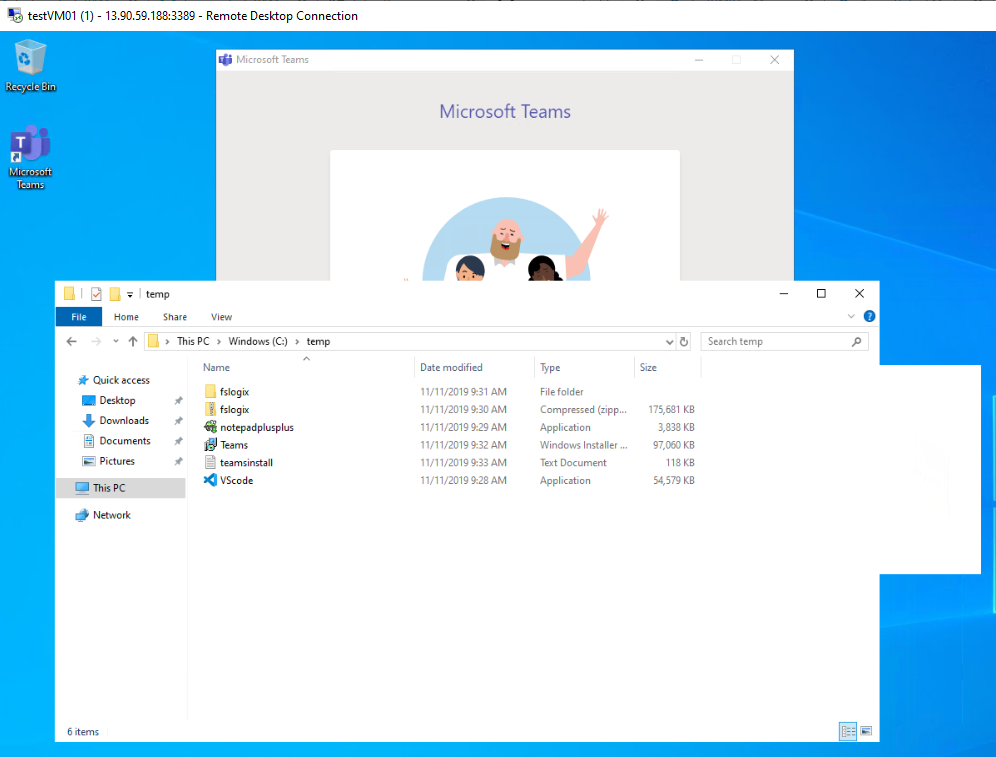
When we login to the VM, we can see that the C:\temp folder has been populated with all the installers, and applications like team have also been installed to our image, just like we wanted.
You can now create different build templates for your different Windows Virtual Desktop hostpools, or create a default server VM image for your IaaS workloads.
If you have any questions, feel free to leave a comment below, or find me on LinkedIn.